|
Micro Bevels are a Knife Sharpener’s Best Friend
by Gary Zinn Many years ago, a coworker asked my help with a pocket knife that he was having trouble sharpening. I took a quick look at the knife, nodded knowingly, and told him that I would bring my sharpening gear to work the next day, get together with him at lunchtime, and show him how to get a good edge on his blade. When we met the next day, I laid out a bench stone and asked my friend to show me how he had been trying to sharpen the knife. I was not surprised when he laid the side of the blade flat against the stone and drew it across, for I had seen telltale grinding scratches on the sides of the blade when I had inspected the knife the day before. I asked, “Why did you do that?” He replied that he understood that the knife had a flat ground blade, so he thought that was how it was supposed to be sharpened. He was correct that the blade had a full flat grind. He did not understand, though, that the way to refresh the cutting edge was not to grind the whole blade, but instead to tilt it so that only a narrow portion of the bevel would be worked against the stone — i.e., sharpen the blade with a micro bevel. I explained and demonstrated how the knife should be sharpened, and then coached my friend through the process. He was delighted with the result, and showed his appreciation by buying me lunch a few days later. My colleague was not alone in his misunderstanding. Over the years, I have encountered other situations in which people were confused about the difference between the primary and secondary (edge) bevels on a knife blade. Ironically, my eldest brother was one of these. He should have known better, because our father taught us both to sharpen knives. My colleague was creating three problems for himself by the way he was trying to sharpen his knife. First, by trying to grind down the entire beveled sides of the blade, he was doing a lot of unnecessary (and frustrating) work. Second, if he had succeeded in getting a sharp edge on the blade, it would have been very thin and weak, so would have dulled very quickly and damaged (e.g., rolled or chipped) very easily. Finally, repeated grinding of the entire sides of the knife would gradually make the blade thinner, something that is almost always undesirable. Sharpening only the micro bevel neatly avoided all three problems. The purpose of this article is to discuss the key role that micro bevels play in sharpening knives, and provide some tips on how a micro bevel may be manipulated to tune a knife for optimal performance, depending on the intended use of the tool. What is a micro bevel? Here is an illustration of blades with primary bevel and secondary micro bevel pairings. This stylized illustration depicts how the primary bevel serves to taper a blade from its full thickness to a rough edge, with the much narrower secondary (micro) bevel then applied to form the final cutting edge. I call any secondary bevel less than 2mm wide a micro bevel. (Some would argue that the term “micro bevel” should refer only to a microscopically narrow bevel at the cutting edge, formed by the final honing of the edge. I am not that doctrinaire, so I use the term micro bevel to refer to a bevel that is narrow when measured in millimeters, rather than in micrometers.)
Illustration courtesy of Carter Crafts.
A
micro bevel is created by
sharpening the edge of the blade at a greater angle, relative to the
plane line of the blade, than the primary bevel. For instance, if the
primary bevel is ground at a 10 degree angle to the blade plane (on
each side of the blade), then the micro bevel might be ground at a 20
degree angle.
The
image on the left, above,
depicts a blade with a hollow primary grind, while I would call the
image on the right a sabre grind; this note leads into the next
topic.
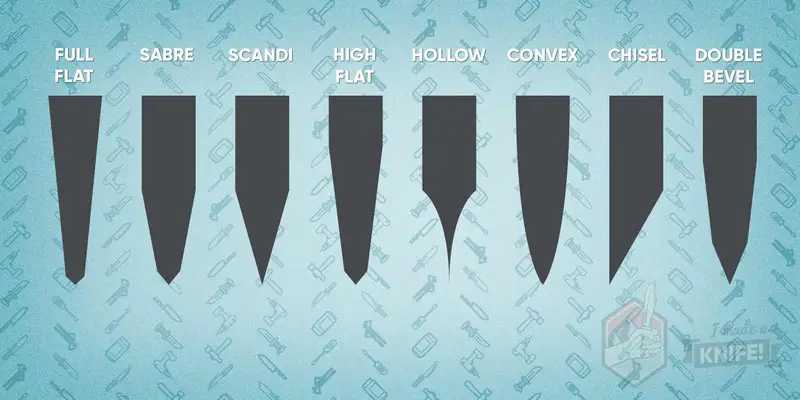
Common
blade grinds
The
most common grinds used on
knives are variations of the flat grind, including the full flat,
sabre, scandi, and high flat grinds. Hollow ground blades are also
very common. Less common are the convex and chisel grinds, while what
is generally called a double bevel grind is similar to a sabre grind,
but with the secondary bevel being wider than a normal micro bevel,
as I have defined it.. The illustration below provides general
depictions of what these grinds look like in cross section.
Focus
on the full flat, sabre, and
high flat grinds first. The cross-section illustrations depict micro
bevels on each of these blades. The micro bevel forms the actual
cutting edge, of course. The illustration of a hollow ground blade, below, does not clearly suggest a micro beveled edge. However, in reality typical hollow ground blades have the concave primary grind that the illustration suggests, but instead of the primary grind being cut to a very thin edge (as on a straight razor), it is cut to a wider rough edge and then a micro bevel is added to form the final cutting edge. The image above shows this better than does the image below.
Common knife blade grinds. Illustration courtesy of Imadeaknife.com. A double bevel grind is akin to a sabre grind, except that the secondary grind on the double bevel is wider than the typical micro bevel on a sabre. Given my admittedly arbitrary call that any secondary bevel less than 2mm wide is a micro bevel, then a secondary bevel 2mm or more wide is simply a double bevel. Understand that there are no hard-and-fast rules regarding this distinction, and it does not really matter, anyway. (I discuss the distinctions between the variations of flat ground blades further in a footnote at the end of the article.) The convex and chisel grinds are unique. A convex ground blade has a curved bevel, formed by each side of the blade being ground in a shallow arc to the cutting edge, with no micro bevel added. A pure chisel grind is created by grinding a pronounced primary bevel on only one side of the blade, leaving the opposite side flat. I have not forgotten the scandi grind. I saved it for last because, to me, a pure scandi grind is essentially a two-sided, symmetrical chisel grind. I referred to “pure” chisel and scandi grinds to denote that knives made with these grinds normally do not feature a secondary bevel. Secondary bevels are used on certain chisel ground knives, e.g., the CRKT K.I.S.S. and P.E.C.K. models. One can easily add a micro bevel to a knife with a scandi ground blade, and I think doing so is a good idea. I will say more about that below. The benefits/advantages of micro bevels Blades with micro bevels require relatively little work to sharpen, because one is grinding only a narrow band at the edge of the blade. A micro bevel makes for a stronger, more durable cutting edge than a blade sharpened at a narrower primary grind angle. Grinding only the micro bevel avoids thinning the blade. These points are fairly obvious, but some amplifications and additions are in order. I mentioned that a micro bevel can be manipulated to tune blade performance. This involves choosing the angle at which the bevel is cut, relative to the plane of the blade. A narrow angle micro bevel — say 15 degrees on each side of the blade — can result in a very keen edge, while a wider angle bevel — say 20 degrees each side — will give a more durable edge. Here are examples that illustrate the implications of this. I have a fillet knife sharpened with micro bevels at about 12 - 13 degrees of angle. It is extremely sharp, as intended, but the thin edge will not stand any abuse, and needs to be touched-up frequently to keep it at top acuity. By contrast, I have a heavy-bladed brute knife that I use for hard cutting and rough work, with secondary bevels cut at about 22.5 degrees. I can do long, heavy cutting sessions with this knife, for its sturdy edge will take the strain. No way, though, that the edge is as sharp as many of my other knives. That said, the majority of my blades currently wear micro bevels set at about 17 degrees. This is a good compromise between the acuity potential of narrow angle micro bevels and the edge durability of wide angle bevels. I set and touch-up the micro bevels on my knives with a Lansky Master’s Edge https://www.chuckhawks.com/lansky_masters_edge.html ceramic sharpener, the rods of which can be set for 17, 20, or 25 degree sharpening angles. In my world, 17 degrees is the best setting of the three for a general purpose cutting edge. Also, 17 degrees is a magic number of sorts for the micro bevel angle on hollow ground blades. For instance, Buck Knives recommends that their hollow ground blades be sharpened at an angle of 13 to 16 degrees. I use my Lansky ceramic rod sharpener, set at 17 degrees, on my Buck knives, and other brands with hollow ground blades, and have no problem getting very good edges on them. My experience-based advise is to cut the edge bevels on hollow ground blades at 15 to 17 degrees of angle, and be happy. Although the convention is to do scandi grinds with only a primary bevel, I have become an advocate of adding a micro bevel. I have a Morakniv Companion “beater knife,” with a scandi ground common stainless steel blade. As sharpened at the factory, the bevel had an angle of about 11 degrees on each side of the blade. (Trust me, I did the math.) I modified the blade grind by cutting a 17 degree micro bevel on each side. I added the micro bevel to make the cutting edge more durable, and routine sharpening quicker and easier. Other things equal, an edge bevel of 17 degrees each side will cut considerably longer before sharpening is needed than will one of 11 degrees each side. Sharpening a micro bevel is quicker and easier than sharpening a wider primary bevel, because much less steel needs to be ground away to restore the edge on a micro bevel. (The primary bevel of the Mora Companion is about 5mm wide, while the micro bevel I added is barely 1mm wide.) I have other scandi blades that have gotten the same treatment. Adding micro bevels to these knives has worked very well for me. Micro bevels are especially good friends to owners of knives with blades of the increasingly popular “super steels” (S35VN, CTS-XHP, Elmax, etc.). These high-tech steels are very wear resistant, which means that they hold an edge exceptionally well. The downside of this is that they are a challenge to sharpen. In an article on this subject, I argued that the keys to dealing with these allegedly “hard to sharpen” steels are (1) use appropriate sharpening tools (diamond grit or ceramic sharpeners) and (2) sharpen only the relatively narrow secondary bevels of these knives, while avoiding grinding the primary bevels like the plague. Repeated sharpening will gradually make the secondary bevels slightly wider, but that is of no consequence. It may take somewhat more time, effort, and patience to sharpen super steel blades, but it is not necessarily the nearly impossible task that cyberspace rumors would suggest. See Sharpening S30V and Similar Super Steel Knife Blades https://www.chuckhawks.com/sharpening_S30V.html for more information. My final point regarding the sharpener-friendly benefits of micro bevels (or secondary bevels in general) is that they make it unnecessary to grind the primary bevel during a routine sharpening. I believe that many do-it-yourself sharpeners assume that any sharpening should involve some grinding on the primary bevel. This is not true. Rather, in a routine sharpening of a blade with a dull, but otherwise undamaged edge, one should grind the secondary (edge) bevel only. Done properly, this will be sufficient to restore an acute cutting edge. Do not grind the primary bevel unless there is a compelling reason to do so, such as severe damage to the edge that requires setting back the primary bevel to correct. Incidentally, I have never met a do-it-yourself knife sharpener who could do anything with a hollow ground primary bevel. Major repair or refurbishment of a hollow ground blade is best handled by sending it in for factory service. Do not try it at home! A micro bevel on a blade is, indeed, the knife sharpener’s best friend. It generally makes sharpening easy and quick, and gives one the ability to tune the blade edge to optimize sharpness, enhance edge retention, or attain a desired balance of these two important properties. Further information
This
article does not focus on
sharpening tools and techniques; see the
“Sharpening” section of
the Guns and Shooting
Online Cutlery page
https://www.chuckhawks.com/index2u_cutlery.html
for articles with specific information on techniques and tools. Footnote: variations of flat ground knife blades There is a set of terms generally used to distinguish between variations of flat ground knife blades. However, the terms, and the distinctions they represent, are not necessarily precise. This is my interpretation of these terms and the distinctions they imply. I start with the Full flat grind, since it is a convenient point of reference. Imagine a piece of blade steel, 1/8” thick by 1” wide, and of some length (which is unimportant to this discussion). A full flat grind would symmetrically grind both 1” wide sides of this piece of blade stock, so that the sides taper from the 1/8” thickness at one edge (the blade spine), to a rough cutting edge opposite the spine. Viewed in cross-section, the full flat grind converts a rectangular piece of material into a thin wedge. Note that the grinding angle in this example would be very small, 3.58 degrees on each side to be precise (I did the math). I mention this because the other flat grind variants leave a portion of the blade at full thickness, which implies that those blades will be stronger than a full flat ground blade. Further, grinding less than the full width of the blade sides increases the angle of the primary grind, which (in principle) yields a more durable blade edge than that of a full flat grind. Next, consider the Sabre grind. A sabre grind, generally defined, leaves the top half (more or less) of the blade blank at full thickness, with the tapered primary grind done on the bottom half. This is arbitrary, but my rule of thumb is that a sabre ground blade is one on which between 40 and 60 percent of the blade sides are left at full thickness. If a 1/8” thick by 1” wide piece of blade stock were ground to leave 1/2” of the sides at full thickness, the grinding angle would be 7.13 degrees on each side, about twice the grinding angle of the full flat ground example. Also, the cross-sectional area of the sabre ground blade would be 50 percent greater than that of the full flat ground piece, which implies that the sabre ground blade would be that much stronger, other things equal.
The
remaining flat grind variants
can be referenced to these two. A High flat grind is one that leaves some of the blade sides at full thickness, but less than about 40 percent of the blade width. A high flat grind that leaves about a fourth of the blade width unground is typical. High flat ground blades are inherently somewhat stronger than full flat ground blades. A Scandi grind is one that leaves more than about 60 percent of the blade sides at full thickness. My general observation is that the primary bevel on scandi ground blades generally spans one-fourth to one-third of the blade width. Scandi ground blades are very sturdy, because so much of the blade is maintained at full thickness. A Double bevel grind typically combines a primary grind that falls into the sabre category with a secondary bevel that is somewhat wider that the 2mm wide limit that I associate with what I have called a micro bevel. In cross section, a double ground blade has the appearance of a double-shouldered wedge. This grind is most often used on relatively thick blades (say 3/16” or thicker) designed for heavy-duty, high-force cutting. These, then, are the flat grinds that are most used on production and custom knives. Brief comments on the other grind types will round out this discussion. Hollow grinds may involve the entire sides of a blade (full hollow grind), but typically are similar to the sabre or high flat grinds, as described above; hollow ground blades are very common. Convex ground blades get some play, especially in high-end production knives, and among some custom knife makers. Chisel ground blades are used on certain specialized chef knives, and sometimes on novelty knives, such as half-handled folders. Otherwise, the chisel grind gets very little play in knife making, either in production or custom knives. |